Slicers allow you to create different versions of a published document with data that is filtered according to your "slicer selections." For example, you can add a Country slicer to your publication and set up interactions between it and a number of visuals describing Sales data; when the publication is exported or a subscription is created you can select, say, USA from your slicer to create a document where all Sales visuals show the relevant data for the USA only.
In effect, this functionality allows you to create a "template" in Publish Pro and then use slicers and the Interaction Manager to manage how the visuals in the document will be populated when the publication is built from that template. This can produce hundreds or even thousands of published report variations.
Important: In Discover or Present, your slicer is typically a drop-down or set of buttons that are shown on your canvas. For Publish, this is not the case. A publication slicer is not used by a reader to select their filtering but is applied to the output document when it is built. It, therefore, does not appear on any canvas nor does it have any formatting or styling settings.
Adding Slicers to a publication
There are various options for adding slicers to publications. However your slicer is created, you can edit its configuration later using the Slicer Settings.
Tip: When building a new slicer in Publish Pro, the slicer and its target should be selected from the same data model, otherwise an error may be returned. If the slicer and the target come from different data models, you may configure a model mapping to create a viable interaction between them. For more information, see Model Mapping in Publish Pro.
Add Existing Slicers
The existing slicers that you can add to your publication were created in Discover and are saved to the content manager. You do not need to have created the slicers yourself, but you must have access to the folders they were saved to if you want to use them in your publication.
- Click here for details describing how to add an existing slicer
Build a New Slicer
You can also build a new slicer on-the-fly in your publication. This is done using one of the following processes:
Create a "Quick" Slicer
If you want to add a very simple slicer, accepting the default settings, you can use the New Slicer option in the Toolbox. This is recommended if you don't want to create any special configuration and just want your slicer to include the same "slices" as the elements in your dimension. As an example, you should use this if you are not going to limit the elements used in your Country slicer.
- Click here for details describing how to create a Quick Slicer
Tip: If you create a slicer using this basic option, you can still set advanced settings later in the Slicer Settings panel.
Create an Advanced Slicer
If you want to create a customized slicer, you can use the Advanced Slicer wizard from the overhead ribbon. This is recommended if you want to create your slicer with some special configuration; for example, if you are going to limit the elements that can be selected from your slicer on build.
- Click here for details describing how to create an Advanced Slicer
Add New Slicer
If you are currently using the Interaction Manager or creating a Page Repeater, you can click the Add New Slicer button in the panel to create a new slicer. Note: Creating a new slicer in the Page Repeater panel limits its use to the Page Repeater only.
- Click here for details describing how to add a Page Repeater slicer
- Click here for details describing how to add a slicer in the Interaction Manager
Edit your Slicer
Once your slicer has been created, you can manage its settings either from the Interaction Manager or Page Repeater panel:
Slicer to Visual Interactions
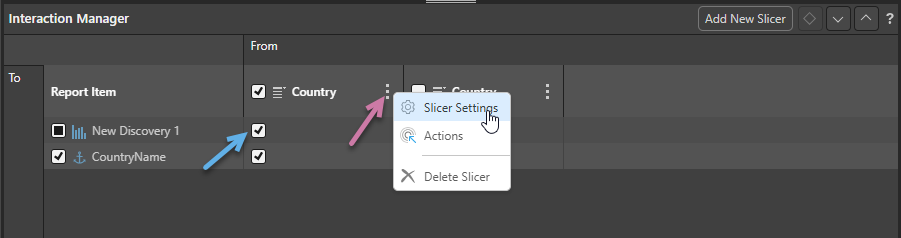
You can select or clear the checkboxes between your slicers and the visuals or placeholders to create an interaction:
- When the checkbox is selected (blue arrow), there is an interaction between the slicer in the From column and the content item in the To row. This indicates that the content item in the To field will be filtered by the slicer when the publication is built.
- When the checkbox is clear, there is no interaction between the slicer and the content item. This indicates that the content item will not be filtered by the slicer when the publication is built.
- Click here for more information about the Interaction Manager
Context Menu items
Slicer Settings
Update the Settings associated with a slicer that already exists in your publication. You can edit the slicer settings in the Slicer Settings panel, changing the slicer's title or configuring its elements list as needed.
- Click here for more information about Slicer Settings
Actions
Actions are only used to configure the Jump to Tab action in Publish. This feature is used to select which Tab (and therefore the visuals or images that the tab contains) should be shown in your Mini-Tab container when your publication is built.
- Click here for more information about Conditional Tabs (Jump Actions)
Delete Slicer
Since slicers do not appear on the canvas of your publication, you can only delete them from the Interaction Manager.
From the Interaction Manager or Page Repeater, click the ellipse alongside the slicer heading and select Delete Slicer.
Related information
Page Repeater
You can use the Page Repeater to render a single page in your publication multiple times, with visuals on each of the repeat pages filtered using a different slice value. You may want to use this feature to maintain one visual for, say, sales data but then publish a document that repeats the Sales page for each of your company's countries as defined by a slicer.
- Click here for details of the Page Repeater